Clean Up a Slow Performing Computer
Has your computer started to lag after months or even years of use? There are several methods you can try to restore its performance. This comprehensive guide covers 16 ways to clean up a slow-performing Windows or Mac computer. We’ll discuss removing old files and programs, tweaking settings, physically cleaning your device, and more.
Method 1: Restart Your Computer
Turn your computer off, then back on again. Restarting your computer can clear any processes running in the background and free up space in RAM. Leaving your computer powered down for a few minutes can also help it cool down, as excessive heat can cause your computer to run slowly.
Method 2: Close Unneeded Tabs
Close tabs you aren’t using. The more tabs you have open, the more RAM your browser uses. Closing unnecessary tabs allows the remaining open apps and processes to use more resources and run faster.
Method 3: Turn Off Browser Extensions
Browser extensions consume computer resources. If you have many browser extensions running, they might slow down your computer. Most browsers have a feature to disable extensions. For instance, you could deactivate Honey when you’re not shopping.
Chrome:
- Click the three-dot menu at the top-right corner of Chrome.
- Select More tools and then Extensions.
- Click the slider button to turn off an extension. The slider will move to the left and turn gray when the extension is turned off.
- Repeat these steps to re-enable the extension when needed.
Safari:
- Click the Safari menu.
- Select Settings and then Extensions.
- Click the checkbox to turn off an extension. Repeat these steps to reactivate it when needed.
Method 4: Clear Your Browser Cache
Delete your browser cache. Your browser stores information about web pages in the cache to load them quickly upon revisiting. Deleting the cache frees up space, improving performance for future visits. Websites may load slowly at first but will get faster over time. For detailed instructions, check these popular browser guides:
- Clearing the cache in Firefox
- Clearing the cache in Google Chrome
- Clearing the cache in Safari
Method 5: Close Open Apps (Windows)
Use Task Manager to close open apps.
- Right-click the Start menu and select Task Manager or press
Ctrl + Shift + Esc. - Click the Processes tab (Windows 11 users will see this tab automatically).
- If you see any high memory usage apps that aren’t needed, right-click the app’s name and select End Task. Repeat until you’ve closed all unnecessary apps.
Method 6: Close Open & Startup Apps (Mac)
Use Activity Monitor to close open apps.
- Open Spotlight by clicking the magnifying glass icon in the top-right corner.
- Type activity monitor and double-click Activity Monitor in the results.
- Click the CPU tab.
- Select a high-memory program and click X in the upper-left side. Choose Quit or Force Quit as needed.
Disable startup apps: Ventura:
- Open the Apple menu and select System Settings.
- Click General and then Login Items.
- Select an app you don’t want to launch automatically and click the – symbol.
Monterey and earlier:
- Open the Apple menu and select System Preferences.
- Select Users & Groups and then your name.
- Click Login Items.
- Uncheck any item’s box to disable it at startup. You may need to click the lock icon and enter your password to make changes.
Method 7: Disable Unneeded Startup Apps (Windows)
Remove unnecessary startup apps.
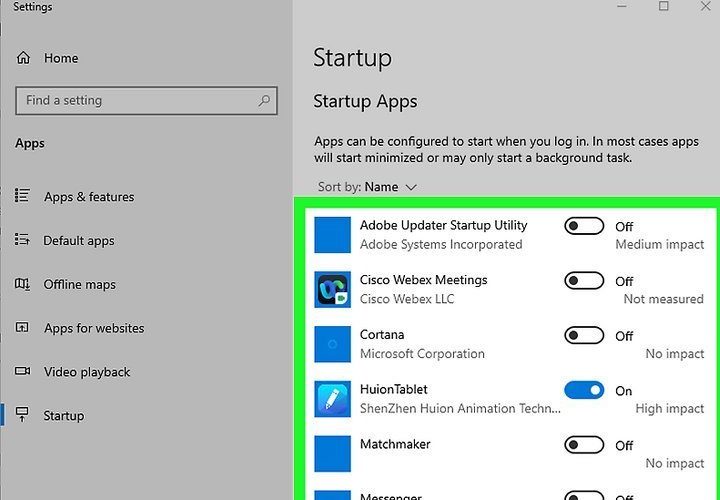
- Press the Windows key and type startup.
- Click Startup Apps in the search results.
- You’ll see switches next to app names. If the switch is enabled, the app starts automatically.
- Click the switch to turn off any app you don’t need at startup.
Method 8: Uninstall Programs (Windows)
Uninstall unnecessary programs to free up space.
- Open Settings by clicking the gear icon in the Start menu.
- Go to Apps and select Apps & features.
- Click the program you want to uninstall and select Uninstall.
Method 9: Uninstall Programs (Mac)
Uninstall unnecessary programs to free up space.
- Open a new Finder window.
- Click Applications in the sidebar.
- Move the program to the Trash or use File > Move to Trash.
- Enter admin credentials if prompted.
- Empty the Trash by going to Finder > Empty Trash.
Method 10: Defragment Your Hard Drive (Windows)
Understand defragmentation. Defragmenting organizes fragmented data on a hard drive, improving retrieval times. This is only necessary for heavily used Windows computers with traditional hard drives (not SSDs).
- Open Start and type defragment and optimize drives.
- Click Defragment and Optimize Drives.
- Select your hard drive and click Optimize.
- Allow the process to run, which may take several hours.
Method 11: Empty the Recycle Bin (Windows)
Free up disk space by emptying the Recycle Bin.
- Double-click the Recycle Bin icon on your desktop.
- Right-click any file you want to keep and choose Restore.
- Click Empty Recycle Bin and confirm by clicking Yes.
Method 12: Empty the Trash (Mac)
Speed up your Mac by emptying the Trash.
- Click the Trash icon on the Dock.
- Drag any files you want to keep out of the Trash.
- Click Empty at the top-right corner of the Finder window and confirm by clicking Empty Trash.
Method 13: Use Disk Cleanup (Windows)
The Windows Disk Cleanup tool can delete unneeded files taking up space on your computer. To open Disk Cleanup:
- Press
Windows key + Sto activate the search bar. - Type cleanup.
- Click Disk Cleanup in the search results.
Clean up system files:
- Click Clean up system files in the bottom-left corner of the Disk Cleanup window.
- Check every box on the page to delete all available items.
- Click OK and then Delete Files when prompted. This process may take a while.
Method 14: Use Disk Cleanup (Mac)
The Disk Cleanup tool on your Mac helps manage storage and free up space. To open the tool:
macOS Ventura:
- Click the Apple menu.
- Click System Settings.
- Click General.
- Click Storage.
macOS Monterey and earlier:
- Click the Apple menu.
- Click About This Mac.
- Click Storage.
- Click Manage (Monterey and earlier).
Optimize storage:
- Click Optimize to get rid of temporary or unnecessary files and move watched movies and TV shows into iCloud.
Method 15: Move Your Computer for Better Ventilation
If your computer isn’t well-ventilated, it might overheat and slow down. Keep your computer in an open space with room on all sides to dissipate heat. For laptops, consider using a laptop riser.
Method 16: Reinstall Windows
Use Fresh Start on Windows. This feature reinstalls and updates Windows while keeping your personal data intact.
On Windows 11:
- Open the Settings menu and go to the System section.
- Select Recovery.
- Click Reset PC and choose Keep my files.
On Windows 10:
- Open the Settings menu and go to Update & Security.
- Select Reset this PC > Get Started and choose Keep my files.
Method 17: Reinstall macOS
Use macOS Recovery. This built-in feature reinstalls macOS, providing a clean start and resolving performance issues.
Apple silicon (M series processors):
- Power on your computer and hold the power button until the startup options window appears.
- Click the Options button (gear icon) and select Continue.
- Choose Reinstall macOS and follow the prompts.
Intel processors:
- Power on your computer and press
Cmd + Rimmediately. - Wait for the Apple logo to appear.
- Select a user and sign in with the admin password.
- Choose Reinstall macOS and follow the prompts.
Method 18: Physically Clean Your Computer
Dust and debris can cause your computer to run hotter and slower. Regular physical cleaning can help maintain performance.
- Turn off and unplug your computer.
- Use compressed air to gently blow out dust from vents, fans, and components.
- Wipe down the exterior with a microfiber cloth.
- Avoid touching internal components directly.


Add comment